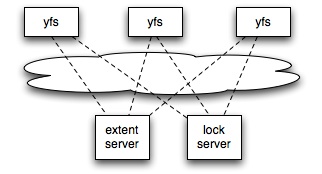
In this sequence of labs, you'll build a multi-server file system called Yet Another File System (yfs) in the spirit of Frangipani. At the end of all the labs, your file server architecture will look like this:
You'll write a file server process, labeled yfs above, using the FUSE toolkit. Each client host will run a copy of yfs. Each yfs will create a file system visible to applications on the same machine, and FUSE will forward application file system operations to yfs. All the yfs instances will store file system data in a single shared "extent" server, so that all client machines will see a single shared file system.
This architecture is appealing because (in principle) it shouldn't
slow down very much as you add client hosts. Most of the complexity is
in the per-client yfs program, so new clients make use of
their own CPUs. The extent server is shared, but hopefully it's simple
and fast enough to handle a large number of clients. In contrast, a
conventional NFS server is pretty complex (it has a complete file
system implementation) so it's more likely to be a bottleneck when
shared by many NFS clients.
Lab assignments
Lab 1 - Lock Server
Lab 2 - Basic File Server
Lab 3 - MKDIR, UNLINK, and Locking
Lab 4 - Caching Lock Server
Lab 5 - Caching Extent Server + Consistency
Lab 6 - Paxos
Lab 7 - Replicated lock server
Lab 8 - Project
You should be able to do Lab 1 on any Unix-style machine, including your own Linux/FreeBSD desktops, MacOS laptops, or any Athena SunOS/Linux workstation.
For Labs 2 and beyond, you'll need to use a computer that has the FUSE module, library, and headers installed. You should be able to install these on your own machine by following the instructions at fuse.sourceforge.net; we outline instructions for Ubuntu/Debian machines. However, the official programming environment for this class will be the Athena Linux machines (you can find a list of Athena Linux workstation locations here). What we mean by official is that we will be testing your assignments using that environment, so please make sure your code passes the tests on an Athena Linux machine.
Note that if you have your own FreeBSD or MacOS machines that you prefer to use for programming, you should be able to use them for the majority of the work. However, there are minor annoying differences between FUSE on Linux and FUSE on other operating systems that may cause your code to fail our tests when it seems to pass for you. As an example, on Linux FUSE passes file creation operation to the file system using the MKNOD call, while on other systems it uses CREATE. Please ensure that your assignment passes the tests in the Athena Linux environment, and there shouldn't be any problems when we test it.
Some Athena Linux workstations do not have FUSE installed on them by default. We have created a 6.824 locker that includes all the necessary FUSE files, as well as installation scripts. Note that you must be root to run these scripts. To install FUSE on an Athena Linux workstation, do the following:
% attach 6.824
% tellme root
% su -
  [Now enter the root password shown in the previous command to become root]
% /mit/6.824/install-fuse.sh
% exit
Now you should be able to compile your FUSE-based programs and run them without any problems. When you are finished with a session and are about to log out, MIT asks that you please clean up after yourself by uninstalling the FUSE programs. Do this as follows:
% tellme root
% su -
  [Now enter the root password shown in the previous command to become root]
% /mit/6.824/uninstall-fuse.sh
% exit
sudo aptitude install libfuse2 fuse-utils libfuse-devNext, you need to make sure the fuse module is loaded:
% ls -l /dev/fuse
  crw-rw-rw- 1 root fuse 10, 229 2010-02-11 06:02 /dev/fuse
If your ls output matches the above output, then you can skip the modprobe step. If you do not see the above output, try running modprobe:
% sudo modprobe fuseFinally, you need to add yourself to the fuse group to be able to mount FUSE file systems:
% sudo adduser {your_user_name} fuse
Make sure to logout of you current session to refresh your group list.
When you logged in again, typing groups at the command line should
show fuse as one of the groups:
% groups
  alex users fuse admin
You will use C++ STL classes such as map and string a lot, so it's worth while to be familiar with the methods they offer; have a look here.
All the labs use the POSIX threads API (pthreads). A comprehensive guide to programming with pthreads can be found here: http://www.llnl.gov/computing/tutorials/pthreads/
The labs use the FUSE interface to plug the lab file system into the operating system. See the FUSE website for more information.
printf statements are often the best way to debug. You may also want to use gdb, the GNU debugger. You may find this gdb reference useful. Below are a few tips.
If your program crashes and leaves a core dump file, you can see where the crash occured with gdb program core, where program is the name of the executable. Type bt to examine the call stack at the time of the crash.
If you know your program is likely to have a problem, you can run it with gdb from the beginning, using gdb program. Then type run.
If your program is already running (or it is hard to start with gdb due to complex start-up scripts), you can attach gdb to it by typing gdb program 1234, where 1234 is the process ID of your running program.
While in gdb, you can set breakpoints (use the gdb command b) to stop the execution at specific points, examine variable contents (print ...), get a list of threads (info threads), switch threads (thread X), etc.
To apply a given gdb command to all threads in your program, prepend thread apply all to your command. For example, thread apply all bt dumps the backtrace for all threads.
Look at the GDB manual for full documentation.
Questions or comments regarding 6.824? Send e-mail to 6.824-staff@pdos.csail.mit.edu.
Top // 6.824 home //