We provide you with skeleton code for both the YFS and extent server modules above.
The YFS module implements the core file system logic. This module runs as a single process called yfs_client that supports a mountpoint on the local host. The code skeleton for this module consists of two pieces:
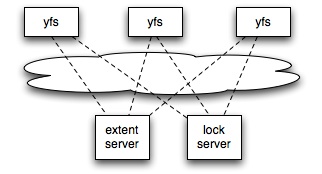
The extent server stores all the data representing your filesystem, much like a hard disk in an ordinary file system. In later labs, you will run YFS clients on multiple hosts, all of them talking to the same extent server; the desired effect is that all the hosts see and share the same file system. The only way the multiple YFS clients can share data is through the extent server. The extent server code skeleton consists of two pieces:
Merge your solution to Lab 1 with the new code we supply for Lab 2. To do this, first commit your solution to Lab 1:
% cd lab
% git commit -am 'my solution to lab1'
Created commit 254dac5: my solution to lab1
 3 files changed, 31 insertions(+), 6 deletions(-)
Before you commit, you will need to explicitly
Next, fetch the latest version of the course repository, then create a local branch called lab2 based on our lab2 branch, origin/lab2:
% git pull
remote: Generating pack...
[...]
% git checkout -b lab2 origin/lab2
Branch lab2 set up to track remote branch refs/remotes/origin/lab2.
Switched to a new branch "lab2"
%
The
You will now need to merge the changes you made in your lab1 branch into the lab2 branch, as follows:
% git merge lab1Git may not be able to figure out how to merge your changes with the new lab assignment (e.g., if you modified some of the code that the second lab assignment changes). In that case,
Here's how to run the extent server and yfs_client(s). If you are using the class machines, choose a port number that other students aren't using. For example, to run the extent server on port 3772, type this:
% cd ~/lab
% make
% ./extent_server 3772 &
Next, start the yfs_client process using three parameters: a unique mountpoint (that other students aren't using), the extent server's port number, and the lock server's port number (not used in this lab). The mountpoint must be an empty directory that already exists. To start the yfs_client using mountpoint ./myfs and extent_server that listens on port 3772, type this:
% cd ~/lab
% mkdir myfs
% ./yfs_client ./myfs 3772 3762 &
We provide you with the script start.sh to automatically start extent_server and yfs_client, and stop.sh to kill previously started processes. Actually, start.sh starts two yfs_clients with ./yfs1 and ./yfs2 mountpoints respectively. Thus you can type:
% cd ~/lab
% ./start.sh
% ./test-lab-2-a.pl ./yfs1
% ./test-lab-2-b.pl ./yfs1 ./yfs2
% ./stop.sh
Note: If stop.sh reports "Device or resource busy", please keep executing stop.sh until it says "not found in /etc/mtab", such as:
fusermount: entry for /home/your_name/yfs-class/yfs1 not found in /etc/mtab
fusermount: entry for /home/your_name/yfs-class/yfs2 not found in /etc/mtab
...
The skeleton code implements only GETATTR and STATFS, so the file system you just mounted will not be very useful. You will implement more FUSE operations in this lab to make your file system more functional.
If you are using your own Linux machine, make sure your user ID is in the fuse group so that you can mount without being root. See Lab Overview about how to add a user to the fuse group. On FreeBSD, you can run sysctl vfs.usermount=1 as root, and then you should be able to run yfs_client as a normal user. Most Linux machines at MIT are already configured to allow mount without being root, for example:
Lab 2 is known to work on Leopard, Tiger, and Snow Leopard.
Your job in Part 1 is to implement the extent server, then implement the CREATE/MKNOD, LOOKUP and READDIR FUSE operations in YFS. You must store the file system's contents in the extent server, so that in Part 2 and future labs you can share one file system among yfs_clients. It is OK for your extent server to store data only in memory; this means that if you restart it, all the data previously stored will be lost.
On some systems, FUSE uses the MKNOD operation to create files, and on others, it uses CREATE. The two interfaces have slight differences, but in order to spare you the details, we have given you wrappers for both that call the common routine createhelper(). You should implement createhelper().
As before, if your server passes our tester on the official class programming environment, you are done. If you have questions about whether you have to implement specific pieces of file system functionality, then you should be guided by the tester: if you can pass the tests without implementing something, then you do not have to implement it. For example, you don't need to implement the exclusive create semantics of the CREATE/MKNOD operation. You may modify or add any files you like, except that you should not modify the the tester script or the RPC library.
The Lab 2 tester for Part 1 is test-lab-2-a.pl. Run it with your YFS mountpoint as the argument. Here's what a successful run of test-lab-2-a.pl looks like:
% ./test-lab-2-a.pl ./yfs1
create file-yyuvjztagkprvmxjnzrbczmvmfhtyxhwloulhggy-18674-0
create file-hcmaxnljdgbpirprwtuxobeforippbndpjtcxywf-18674-1
...
Passed all tests!
The tester creates lots of files with names like file-XXX-YYY-Z and checks that they appear in directory listings.
If you implemented at-most-once RPC correctly, the tests should pass with RPC_LOSSY set to 5 as well.
If test-lab-2-a.pl exits without printing "Passed all tests!", then it thinks something is wrong with your file server. For example, if you run test-lab-2-a.pl on the skeleton code we give you, you'll probably see an error message like this:
test-lab-2-a: cannot create /tmp/b/file-ddscdywqxzozdoabhztxexkvpaazvtmrmmvcoayp-21501-0 : No such file or directory
This error message appears because you have not yet provided code to handle the CREATE/MKNOD operation with FUSE. That code belongs in fuseserver_createhelper in fuse.cc.
Note: testing Part 1 on the command line using commands like touch will not work until you implement the SETATTR operation in Part 2. For now, you should do your testing via the creat/open, lookup, and readdir system calls in a language like Perl, or simply use the provided test script.
Note: Although the test scripts of Lab 2 access extent_server sequentially, we recommend you use a mutex in extent_server to avoid future races.
Both YFS and FUSE need to be able to identify each file and directory with a unique identifier, analogous to the i-node number of an on-disk UNIX file system. FUSE uses 32-bit numbers as identifiers. Your YFS code should use 64-bit numbers whose high 32 bits are zero and whose low 32 bits are the same as the file/directory's FUSE identifier. We have defined such an 64-bit identifier (called inum) in yfs_client.h.
When creating a new file (fuseserver_createhelper) or directory (fuseserver_mkdir), you must assign a unique inum. The easiest thing to do is to pick a number at random, hoping that it will indeed be unique. (What's the collision probability as the number of files and directories grows?)
YFS needs to be able to tell whether a particular inum refers to a file or a directory. Do this by allocating IDs with the 31st bit of one for new files, and IDs with the 31st bit of zero for new directories. The method yfs_client::isfile assumes this property holds for inum.
Note: You are asked to implement fuseserver_mkdir in Lab 3. But do follow this inum naming rule in fuseserver_createhelper to make your Lab 3 easier.
Next, you must choose the format for directories. A directory's content contains a set of name to inum mappings. You should store a directory's entire content in a single entry in the extent server, with the directory's inum as the key. LOOKUP and READDIR read directory contents, and CREATE/MKNOD modify directory contents.
You do not have to implement file modes, permissions, or owners.
When a program (such as ls or a test script) manipulates a file or directory (such as yfs1) served by your yfs_client, the FUSE code in the kernel sends corresponding operations to yfs_client via FUSE. The code we provide you in fuse.cc responds to each such operation by calling one of a number of procedures, for create, read, write, etc. operations. You should modify the relevant routines in fuse.cc to call methods in yfs_client.cc. fuse.cc should just contain glue code, and the core of your file system logic should be in yfs_client.cc. For example, to handle file creation, you should modify fuseserver_createhelper to call yfs->create(...), and you should add a new create(...) method to yfs_client.cc. Look at getattr() in fuse.cc for an example of how a fuse operation handler works, how it calls methods in yfs_client, and how it sends results and errors back to the kernel. YFS uses FUSE's "lowlevel" API.
You can find details on what the methods you implement need to do at fuse_lowlevel.h. Every FUSE handler should either return a successful result to the kernel using one of the fuse_reply_... routines, or else call fuse_reply_err to report an error.
Sending back directory information for READDIR is a bit tricky, so we've provided you with much of the necessary code in the dirbuf_add, reply_buf_limited, and fuseserver_readdir methods. All that's left for you to do for READDIR in fuse.cc is to get the directory listing from your yfs_client, and add it to the b data structure using dirbuf_add.
Though you are free to choose any inum identifier you like for newly created files, FUSE assumes that the inum for the root directory is 0x00000001. Thus, you'll need to ensure that when yfs_client starts, it is ready to export an empty directory stored under that inum.
The bulk of your file system logic should be in yfs_client, for the most part in routines that correspond to fuse operations (create, read, write, mkdir, &c). Your fuse.cc code should pass inums, file names, &c to your yfs_client methods. Your yfs_client code should retrieve file and directory contents from the extent server with get(), using the inum as the extent ID. In the case of directories, your yfs_client code should parse the directory content into a sequence of name/inum pairs (i.e. yfs_client::dirents), for lookups, and be able to add new name/inum pairs. You should not modify the extent server for this part of the lab.
A reasonable way to get going on fuse.cc is to run test-lab-2-a.pl, find the function in fuse.cc whose missing implementation is causing the tester to fail, and start fixing that function. Look at the end of yfs_client1.log and/or add your own print statements to fuse.cc.
If a file already exists, the CREATE operator (fuseserver_create and fuseserver_mknod) should return EEXIST to FUSE. This is hard to test at this point, but may arise in Lab 3 with concurrent creation of the same file from different clients.
start.sh redirects the STDOUT and STDERR of the servers to files in the current directory. For example, any output you make from fuse.cc will be written to yfs_client1.log. Thus, you should look at these files for any debug information you print out in your code.
See the lab overview for general hacking and debugging tips.
If you wish to test your code with only some of the FUSE hooks implemented, be advised that FUSE may implicitly try to call other hooks. For example, FUSE calls LOOKUP when mounting the file system, so you may want to implement that first. FUSE prints out to the yfs_client1.log file the requests and results of operations it passes to your file system. You can study this file to see exactly what hooks are called at every step.
test-lab-2-b.pl tests reading, writing, and appending to files, as well as testing whether files written on one yfs_client instance can be read through a second one. To run the tester, first start two yfs_clients using the start.sh script. It runs two yfs_client processes each mounting the same file system under a different name (yfs1 or yfs2).
% ./start.sh
Now run test-lab-2-b.pl by passing the yfs1 and yfs2 mountpoints. Since the script tests the yfs_clients sequentially, you do not need to worry about locking for this lab.
% ./test-lab-2-b.pl ./yfs1 ./yfs2
Write and read one file: OK
Write and read a second file: OK
Overwrite an existing file: OK
Append to an existing file: OK
Write into the middle of an existing file: OK
Check that one cannot open non-existant file: OK
Check directory listing: OK
Read files via second server: OK
Check directory listing on second server: OK
Passed all tests
% ./stop.sh
If test-lab-2-b.pl exits without printing "Passed all tests!" or hangs indefinitely, then something is wrong with your file server. After you are done with Part 2, you should go back and test with test-lab-2-a.pl again to make sure you did not break anything.
The operating system can tell your file system to set one or more attributes via the FUSE SETATTR operation. See fuse_lowlevel.h for the relevant definitions. The to_set argument to your SETATTR handler is a mask that indicates which attributes should be set. There is really only one attribute (the file size attribute) you need to pay attention to (but feel free to implement the others if you like), indicated by bit FUSE_SET_ATTR_SIZE. Just AND (i.e., &) the to_set mask value with an attribute's bitmask to see if the attribute is to be set. The new value for the attribute to be set is in the attr parameter passed to your SETATTR handler.
The operating system may implement overwriting an existing file with a call to SETATTR (to truncate the file) rather than CREATE.
Setting the size attribute of a file can correspond to truncating it completely to zero bytes, truncating it to a subset of its current length, or even padding bytes on to the file to make it bigger. Your system should handle all these cases correctly.
A read (fuseserver_read) wants up to size bytes from a file, starting from a certain offset. When less than size bytes are available, you should return to fuse only the available number of bytes. See the manpage for read(2) for details.
For writes (fuseserver_write), a non-obvious situation may arise if the client tries to write at a file offset that's past the current end of the file. Linux expects the file system to return '\0's for any reads of unwritten bytes in these "holes" (see the manpage for lseek(2) for details). Your write should handle this case correctly.
% cd ~/lab
% ./stop.sh
% make clean
% rm core*
% rm *log
% cd ..
% tar czvf `whoami`-lab2.tgz lab
or
% cd ~/6.824/lab
% make handin
That should produce a file called [your_user_name]-lab2.tgz in your home directory. Attach that file to an email and send it to 6.824-submit@pdos.csail.mit.edu.