An important part of the Grid project is building and running network protocols on real systems. Simulations are a valuable tool for learning about and comparing wireless protocols and techniques, but as Rodney Brooks observed, ``simulations are doomed to succeed''. That is, we will always be able to find the right protocol tweaks and hacks that work well in any particular simulator environment. However, real-world systems face problems that don't occur in simulation. Building real systems forces you to handle cases where theoretical models are incorrect, or don't capture the right details.
It is true that unlike simulator experiments, testbed experiments cannot be perfectly reproduced. Interference and radio propagation conditions change between each experiment, and for all practical purposes, are out of the experimenter's control. However, experimental results are generally repeatable, and running the same experiment many times over produces consistent results. Some of the main effects that we observe using our indoor testbed are night-day (diurnal) variations, weekly variations (e.g. Friday vs. Sunday), and interference due to other 802.11 equipment or other random interferers. Some results from the indoor testbed can be found in our HotNets paper.
So, despite all the sweat and grunge required to build the testbeds, it has been worth it.
The indoor testbed is on about the fourth version. The first version (Summer 2000) was a handful of laptops with PCMCIA cards. This was used to build and debug an initial DSDV protocol implementation.
Once we though we had some working code, we bought a few mini-desktop machines for the second incarnation (Fall 2000--Spring 2001). We placed these machines around the 5th floor of our lab. They ran Linux, and were gatewayed to the Internet via the DSDV wireless routing protocol implementation. Because some machines were in offices that didn't belong to our research group, we didn't connect them to the wired network, and all network connectivity was via the wireless interfaces using the Grid software. This sort of worked, at least well enough for all of the machines to get hacked, causing us to get admonishing emails every month from the MIT network security team.
Once we became fed up with administering Linux, the third version of the network (Summer 2001--Fall 2002) was deployed in mostly the same manner, but using OpenBSD instead of Linux, with more features added to the DSDV protocol (e.g. geographic forwarding and a simple flooding location service), and with more machine, expanding to 17 machines on the 5th and 6th floors. Again, the sole connectivity for this network came from running DSDV over the wireless interfaces.
The fourth version of the network was deployed in January 2003. Although there is a certain enjoyment to administering a network using the same protocols that you are experimenting with (including making successive versions incompatible), it turns out to be a lot easier if you use another network to administer the machines. This has many advantages. For example, you don't need to visit every machine and reboot it when it crashes, or carry 20 machines back to your office to patch buggy software. Now each testbed machine is connected to the wired ethernet. Machines netboot and mount their filesystems over NFS; local disks are used only to store experiment logs. This version goes back to using Linux, but is easier to administer because all machines use the same root filesystem. Using Linux allows us to use the Click modular router as a kernel module, which is important for protocol performance and functionality. If you're thinking ``what about Emulab'', it's a nice idea, but is more than we need. We also added machines, bringing us up to 22 indoor testbed nodes. The DSDV implementation was continually improved and debugged throughout the whole evolution of the testbed.
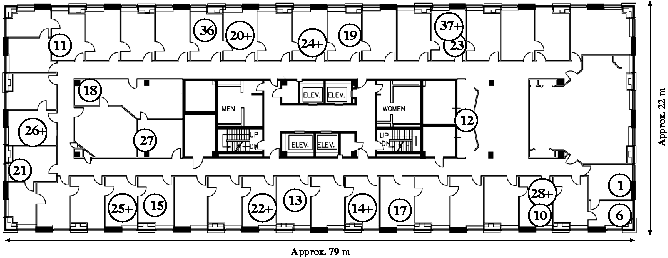
The current indoor testbed has 22 nodes on the 5th and 6th floors of our office building. Nodes marked with `+' are on the 6th floor, the other nodes are on the 5th floor. The floorplan shown is the 5th floor floorplan; the 6th floor has a similar floorplan, but some partitions are different. Most routes between any of the nodes are one, two, or three hops.
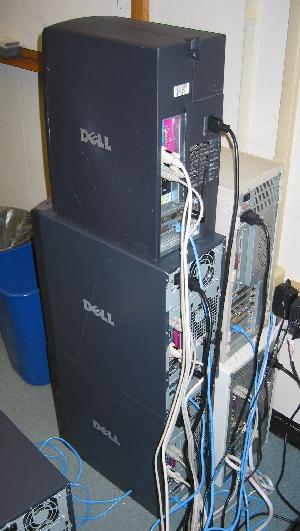
The indoor nodes are tiny little desktop machines that look like this:

Notice the ethernet cable that connects the machine to the real network, and the wireless card in the rightmost slot, with its rubber-duck antenna. All the indoor machines use Cisco/Aironet 340 PCI cards (no longer manufactured) with a 30 milliwatt maximum transmit power. The closest card now available is the Cisco 350 card, which is essentially the same except the maximum transmit power is increased to 100 milliwatts.
We also have a spectrum analyzer, which looks like this:
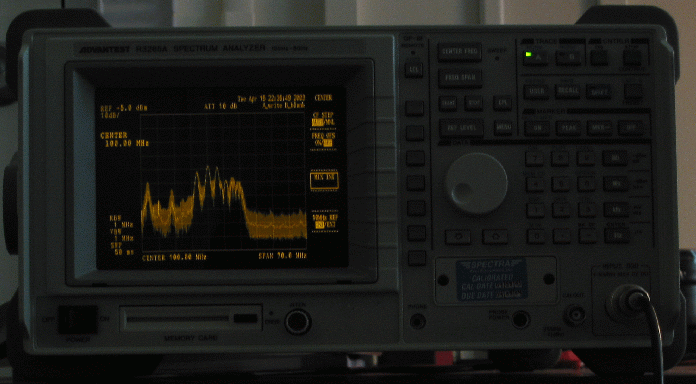
This is a fun tool. It tells you how much energy there is at various points in the RF spectrum. We have used the analyzer to discover that one of the machines in our machine room emits lots of RF energy around 2.4 GHz, and interferes with the lower 802.11 channels.
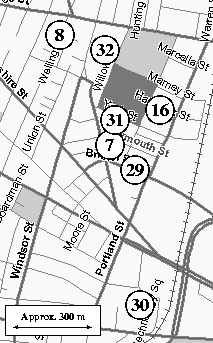
The outdoor roofnet testbed is about 7 nodes, shown in the above map. We are currently revamping the roofnet software, and it will soon be operational, with more nodes. We use the same sorts of machines as the indoor network, but with Cisco 350 cards. The network uses two types of omnidirectional antennas.
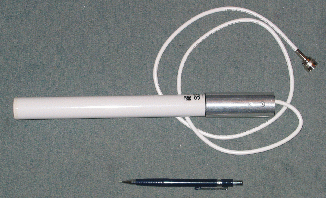
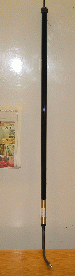
The small white antenna on the right is a 5.2 dBi omnidirectional (Cisco part number AIR-ANT2506); the tall black antenna on the right is 12 dBi (Cisco part number AIR-ANT1949) (notice the newspaper folded in half on the left of the picture). One big difference between the two antennas is that the small one has a much larger vertical gain pattern. That is, both antennas are omnidirectional in the horizontal plane, but the large black one has a tighter vertical angle. However, it's still a large enough vertical angle to acommodate the height differences we are likely to see on our roofnet.
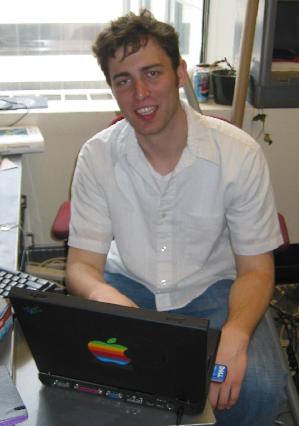
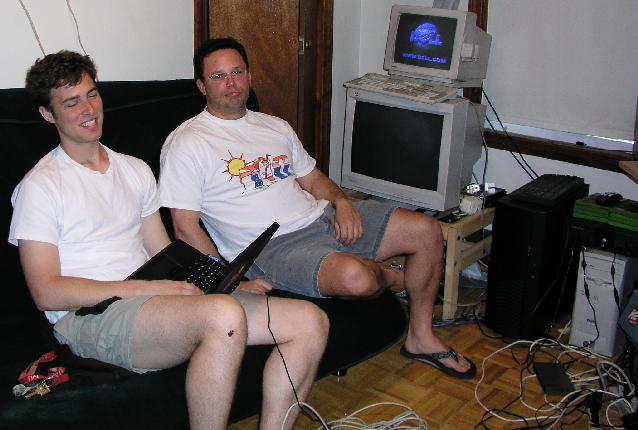
The roofnet software is developed and tested on a mini-network (left), lorded over by grad student John (right):
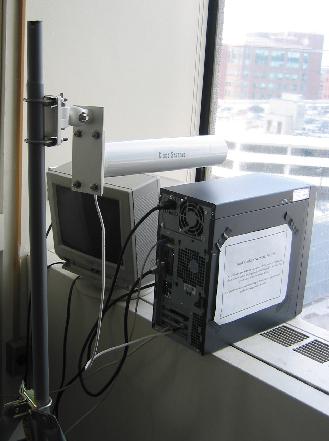
The roofnet is connected to the Internet via a gateway node on the 9th floor of our lab. Because the closest roofnet node is quite far from our lab, the gateway's antenna is a yagi directional (13.5 dBi Cisco AIR-ANT1949) pointed at one of the roofnet nodes. The gateway and its antenna are shown on the left, the yagi's target is shown on the right. The target is somewhere past the green rooftops...
Sometimes things don't work, and you have to debug. It's a real pain when you can't reproduce the bug at lab: you have to schedule visits to a remote locations (read: grad student apartment) to reproduce the bug and try out fixes. The picture below shows John (left) and Doug (right) debugging one of the Grid nodes. Notice the blue Dell splash screen, John and Doug are rebooting the grid node to try a fix, for the umpteenth time... The grid node is the white machine in the lower right, which provides Internet access (via DHCP, NAT, and the wireless network) to the large black machine to its left.
Our current gateway setup puts the Grid roofnet nodes into a private network that is NATed by the 9th-floor gateway node. The roofnet nodes are networked using DSDV over the wireless interfaces. Each roofnet node in turn offers a separately NATed private network through its wired network interface. This gives Internet access to the graduate students who host each Grid roofnet node, albeit through two NATs.
The Grid software used in the testbeds is implemented using the Click modular router, running as a Linux kernel module. All DSDV state (e.g. routing table) is kept by the Click module, and all DSDV routing occurs without the Linux kernel's knowledge. Similarly, all NATing in the roofnet occurs in Click; packets are only passed to Linux when they are destined for that particular node.
If you have any questions about our testbed, contact grid-hackers@pdos.lcs.mit.edu. Because this is an active research project, anything described above may change at any time!
Last modified: $Date: 2003/06/05 20:13:18 $