Handed out Saturday, November 5, 2005
Part A due Thursday, November 10, 2005
Part B due Thursday, November 23, 2005
In this lab, you will implement a simple disk-based file system,
and then write exec code to load and run
an executable stored in this on-disk file system.
The file system itself will be implemented in microkernel fashion,
outside the kernel but within its own user-space environment.
Other environments access the file system
by making IPC requests to this special file system environment.
The exec functionality, however,
will be implemented in neither the kernel nor the file system,
but in typical exokernel fashion,
as part of the user space library operating system
that is linked into each application that wants to use it.
Download the lab 5 code from http://pdos.lcs.mit.edu/6.828/2005/labs/lab5/lab5.tar.gz, and unpack it into your 6.828 directory as before. As usual, you will need to merge our new code for this lab into your source tree or vice versa.
The main new component for this lab is the file system server,
located in the new fs directory.
Scan through all the files in this directory
to get a feel for what all is new.
Also, there are some new file system-related source files
in the user and lib directories,
particularly lib/fsipc.c, lib/file.c,
lib/spawn.c,
and new global header files inc/fs.h
and inc/fd.h.
Be sure to scan through all of these files.
You should run the pingpong, primes, and forktree test cases from lab 4 again
after merging in the new lab 5 code.
You will need to comment out the ENV_CREATE line that starts
fs/fs to avoid Bochs panicking
because fs/fs does some I/O.
If your lab 4 code doesn't contain any bugs, the test cases
should run fine. Don't proceed until they work.
If they don't work,
use diff -u -r lab4 lab5 to review all the
changes, making sure there isn't any code you wrote for lab4 (or before)
missing from lab 5.
Make sure that lab 4 still works.
Then go on to lab 5.
The file system you will work with is much simpler than most "real" file systems including that of v6 UNIX, but it is powerful enough to provide the standard "basic" features: creating, reading, writing, and deleting files organized in a hierarchical directory structure.
We are (for the moment anyway) developing only a "single-user" operating system, which provides protection sufficient to catch bugs but not to protect multiple mutually suspicious users from each other. Our file system therefore does not support the UNIX notions of file ownership or permissions. Our file system also currently does not support hard links, symbolic links, time stamps, or special device files like most UNIX file systems do.
Most UNIX file systems divide available disk space
into two main types of regions:
inode regions and data regions.
UNIX file systems assign one inode to each file in the file system;
a file's inode holds critical meta-data about the file
such as its stat attributes and pointers to its data blocks.
The data regions are divided into much larger (typically 8KB or more)
data blocks, within which the file system stores
file data and directory meta-data.
Directory entries contain file names and pointers to inodes;
a file is said to be hard-linked
if multiple directory entries in the file system
refer to that file's inode.
Since our file system will not support hard links,
we do not need this level of indirection
and therefore can make a convenient simplification:
our file system will not use inodes at all,
but instead we will simply store all of a file's (or sub-directory's) meta-data
within the (one and only) directory entry describing that file.
Both files and directories logically consist of a series of data blocks,
which may be scattered throughout the disk
much like the pages of an environment's virtual address space
can be scattered throughout physical memory.
The file system allows user processes
to read and write the contents of files directly,
but the file system handles all modifications to directories itself
as a part of performing actions such as file creation and deletion.
Our file system does, however, allow user environments
to read directory meta-data directly
(e.g., with read and write),
which means that user environments can perform directory scanning operations
themselves (e.g., to implement the ls program)
rather than having to rely on additional special calls to the file system.
The disadvantage of this approach to directory scanning,
and the reason most modern UNIX variants discourage it,
is that it makes application programs dependent
on the format of directory meta-data,
making it difficult to change the file system's internal layout
without changing or at least recompiling application programs as well.
The UNIX V6 file system uses a block size of 512 bytes, the same as the sector size of the underlying disk. Most modern file systems use a larger block size, however, because storage space has gotten much cheaper and it is more efficient to manage storage at larger granularities. Our file system will use a block size of 4096 bytes, conveniently matching the processor's page size.
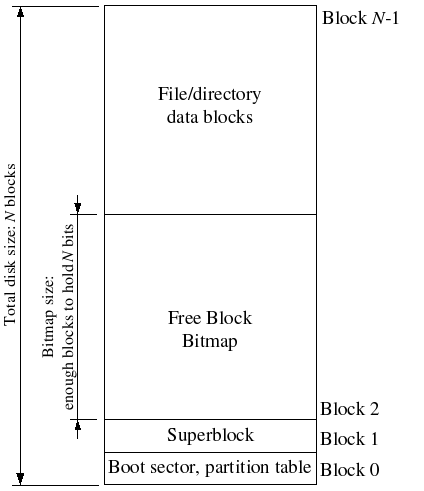
File systems typically reserve certain disk blocks, at "easy-to-find" locations on the disk such as the very start or the very end, to hold meta-data describing properties of the file system as a whole, such as the block size, disk size, any meta-data required to find the root directory, the time the file system was last mounted, the time the file system was last checked for errors, and so on. These special blocks are called superblocks.
Our file system will have exactly one superblock,
which will always be at block 1 on the disk.
Its layout is defined by struct Super in inc/fs.h.
Block 0 is typically reserved to hold boot loaders and partition tables,
so file systems generally never use the very first disk block.
Most "real" file systems maintain multiple superblocks,
replicated throughout several widely-spaced regions of the disk,
so that if one of them is corrupted
or the disk develops a media error in that region,
the other superblocks can still be found and used to access the file system.
In the same way that the kernel must manage the system's physical memory
to ensure that a given physical page is used for only one purpose at a time,
a file system must manage the blocks of storage on a disk
to ensure that a given disk block is used for only one purpose at a time.
In pmap.c you keep the Page structures
for all free physical pages
on a linked list, page_free_list,
to keep track of the free physical pages.
In file systems it is more common to keep track of free disk blocks
using a bitmap rather than a linked list,
because a bitmap is more storage-efficient than a linked list
and easier to keep consistent.
Searching for a free block in a bitmap can take more CPU time
than simply removing the first element of a linked list,
but for file systems this isn't a problem
because the I/O cost of actually accessing the free block after we find it
dominates for performance purposes.
To set up a free block bitmap, we reserve a contiguous region of space on the disk large enough to hold one bit for each disk block. For example, since our file system uses 4096-byte blocks, each bitmap block contains 4096*8=32768 bits, or enough bits to describe 32768 disk blocks. In other words, for every 32768 disk blocks the file system uses, we must reserve one disk block for the block bitmap. A given bit in the bitmap is set if the corresponding block is free, and clear if the corresponding block is in use. The block bitmap in our file system always starts at disk block 2, immediately after the superblock. For simplicity we will reserve enough bitmap blocks to hold one bit for each block in the entire disk, including the blocks containing the superblock and the bitmap itself. We will simply make sure that the bitmap bits corresponding to these special, "reserved" areas of the disk are always clear (marked in-use).
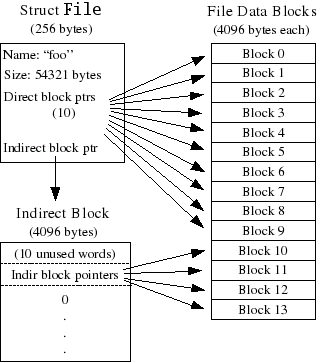
The layout of the meta-data describing a file in our file system
is described by struct File in inc/fs.h.
This meta-data includes the file's name, size,
type (regular file or directory),
and pointers to the blocks comprising the file.
Unlike in most "real" file systems,
for simplicity we will use this one File structure
to represent file meta-data as it appears
both on disk and in memory.
Some of the fields in the structure (currently, only f_dir)
are only meaningful while the File structure is in memory;
whenever we read a File structure from disk into memory,
we clear these fields.
The block array in struct File contains space
to store the block numbers
of the first 10 (NDIRECT) blocks of the file,
which we call the file's direct blocks.
For small files up to 10*4096 = 40KB in size,
this means that the block numbers of all of the file's blocks
will fit directly within the File structure itself.
For larger files, however, we need a place
to hold the rest of the file's block numbers.
For any file greater than 40KB in size, therefore,
we allocate an additional disk block, called the file's indirect block,
to hold up to 4096/4 = 1024 additional block numbers.
To keep bookkeeping simple, we leave the first 10 numbers in the indirect block
unused. Thus, the 10th block number is the 10th slot in the indirect block
(rather than the 0th, as might be done if we were being very space-efficient).
Our file system therefore allows files to be up to 1024 blocks,
or four megabytes, in size.
To support larger files,
"real" file systems typically support
double- and triple-indirect blocks as well.
A File structure in our file system
can represent either a regular file or a directory;
these two types of "files" are distinguished by the type field
in the File structure.
The file system manages regular files and directory-files
in exactly the same way,
except that it does not interpret the contents of the data blocks
associated with regular files at all,
whereas the file system interprets the contents
of a directory-file as a series of File structures
describing the files and subdirectories within the directory.
The superblock in our file system
contains a File structure
(the root field in struct Super),
which holds the meta-data for the file system's root directory.
The contents of this directory-file
is a sequence of File structures
describing the files and directories located
within the root directory of the file system.
Any subdirectories in the root directory
may in turn contain more File structures
representing sub-subdirectories, and so on.
The file system server in our operating system needs to be able to access the disk, but we have not yet implemented any disk access functionality in our kernel. Instead of taking the conventional "monolithic" operating system strategy of adding an IDE disk driver to the kernel along with the necessary system calls to allow the file system to access it, we will instead implement the IDE disk driver as part of the user-level file system environment. We will still need to modify the kernel slightly, in order to set things up so that the file system environment has the privileges it needs to implement disk access itself.
It is easy to implement disk access in user space this way as long as we rely on polling, "programmed I/O" (PIO)-based disk access and do not use disk interruptes. It is possible to implement interrupt-driven device drivers in user mode as well (the L3 and L4 kernels do this, for example), but it is much more difficult since the kernel must field device interrupts and dispatch them to the correct user-mode environment.
The x86 processor uses the IOPL bits in the EFLAGS register to determine whether protected-mode code is allowed to perform special device I/O instructions such as the IN and OUT instructions. Since all of the IDE disk registers we need to access are located in the x86's I/O space rather than being memory-mapped, giving "I/O privilege" to the file system environment is the only thing we need to do in order to allow the file system to access these registers. In effect, the IOPL bits in the EFLAGS register provides the kernel with a simple "all-or-nothing" method of controlling whether user-mode code can access I/O space. In our case, we want the file system environment to be able to access I/O space, but we do not want any other environments to be able to access I/O space at all.
To keep things simple, from now on we will arrange things so that the file system is always user environment 1. (Recall that the idle loop is always user environment 0.)
In the tests that follow, if you fail a test, the obj/fs/fs.img
is likely to be left inconsistent. Be sure to remove it before running
gmake grade or gmake bochs.
| Coding | |
Modify your kernel's environment initialization function,
env_alloc in env.c,
so that it gives environment 1 I/O privilege,
but never gives that privilege to any other environment.
Use | |
Do you have to do anything else to ensure that this I/O privilege setting is saved and restored properly when you subsequently switch from one environment to another? Make sure you understand how this environment state is handled.
Read through the files in the new fs directory in the source tree.
The file fs/ide.c implements our minimal PIO-based disk driver.
The file fs/serv.c contains the umain function
for the file system server.
Note that the new .bochsrc file in this lab
sets up Bochs to use the file kern/bochs.img
as the image for disk 0 (typically "Drive C" under DOS/Windows) as before,
and to use file the (new) file obj/fs/fs.img
as the image for disk 1 ("Drive D").
In this lab your file system should only ever touch disk 1;
disk 0 is used only to boot the kernel.
If you manage to corrupt either disk image in some way,
you can reset both of them to their original, "pristine" versions
simply by typing:
$ rm obj/kern/bochs.img obj/fs/fs.img
$ gmake
| Challenge! Implement interrupt-driven IDE disk access, with or without DMA. You can decide whether to move the device driver into the kernel, keep it in user space along with the file system, or even (if you really want to get into the microkernel spirit) move it into a separate environment of its own. |
DISKMAP)
up to 0xD0000000 (DISKMAP+DISKMAX),
to map a page containing the corresponding disk block
when that disk block is in memory.
Pages of virtual address space in this region
for disk blocks that are not in memory are left unmapped.
For example,
disk block 0 is mapped at virtual address 0x10000000
whenever it is in memory,
disk block 1 is mapped at virtual address 0x10001000,
and so on.
We can tell whether a block is mapped by consulting the vpt.
Since our file system environment has its own virtual address space independent of the virtual address spaces of all other environments in the system, and the only thing the file system needs to do is to implement file access, it is reasonable to reserve most of the file system environment's address space in this way. It would be problematic for a "real" file system implementation on a 32-bit machine to do this of course, since most disks available today are already larger than 3GB. Such a buffer cache management approach may still be reasonable on a machine with a 64-bit address space, such as Intel's Itanic or AMD's Athlon 64 processors.
| Coding | |
Implement the read_block and write_block functions
in fs/fs.c.
The read_block function
should test to see if the requested block is already in memory,
and if not, allocate a page and read in the block
using ide_read.
Keep in mind that there are multiple disk sectors per block/page,
and that read_block needs to return the virtual address
at which the requested block was mapped.
The
Use
| |
After fs_init calls read_super
(which we have provided)
to read and check the file system superblock,
fs_init calls read_bitmap
to read and perform basic validity checking
on the disk's block bitmap.
For speed and simplicity,
our file system will always keep the entire block bitmap in memory.
| Coding | |
Implement read_bitmap.
It should check that all of the "reserved" blocks in the file system -
block 0, block 1 (the superblock),
and all the blocks holding the block bitmap itself,
are marked in-use.
Use the provided block_is_free routine for this purpose.
You may simply panic if the file system is invalid.
Use | |
| Coding | |
Use block_is_free as a model
to implement alloc_block_num,
which scans the block bitmap for a free block,
marks that block in-use,
and returns the block number.
When you allocate a block, you should immediately flush the
changed bitmap block to disk with write_block, to help
file system consistency.
Use | |
We have provided a variety of functions in fs/fs.c
to implement the basic facilities you will need
to interpret and manage File structures,
allocate and/or find a given block of a file,
scan and manage the entries of directory-files,
and walk the file system from the root
to resolve an absolute pathname.
Read through all of the code in fs/fs.c carefully
and make sure you understand what each function does
before proceeding.
| Coding | |
Fill in the remaining functions in fs/fs.c
that implement "top-level" file operations:
file_open,
file_get_block,
file_truncate_blocks,
and file_flush.
Use | |
You may notice that there are two operations conspicuously absent
from this set of functions implementing "basic" file operations:
namely, read and write.
This is because our file server
will not implement read and write operations directly
on behalf of client environments,
but instead will use our kernel's IPC-based page remapping functionality
to pass mapped pages to file system clients,
which these client environments can then read and write directly.
The page mappings we pass to clients will be
exactly those pages that represent in-memory file blocks
in the file system's own buffer cache, fetched via
file_get_block.
You will see the user-space read and write in part B.
| Challenge! The file system code uses synchronous writes to keep the file system fairly consistent in the event of a crash. Implement soft updates instead. |
The client stubs,
which we have implemented for you and provided in lib/fsipc.c,
implement the "client side" of the file system server's IPC protocol.
Like fork,
these functions are linked into each application
that wants to use the file system.
When a client application needs to communicate with the file server,
it will use the client stubs to perform this communication.
Each client stub uses ipc_send to send a message to the server,
and then uses ipc_recv to wait for a reply to its request.
| Coding | |
The server stubs are located in the file server itself,
implemented in fs/serv.c.
These stubs accept IPC requests from clients,
decode and validate the arguments,
and serve those requests using the file access functions in fs/fs.c.
We have provided a skeleton for this server stub code,
but you will need to fill it out.
Use the client stubs in lib/fsipc.c
to help you figure out the exact protocol
between the client and the server.
Use | |
Although we can write applications
that directly use the client-side stubs in lib/fsipc.c
to communicate with the file system server and perform file operations,
this approach would be inconvenient for many applications
because the IPC-based file server interface is still somewhat "low-level"
and does not provide conventional read/write operations.
To read or write a file,
the application would first have to reserve a portion of its address space,
map the appropriate blocks of the file into that address region
by making requests to the file server,
read and/or change the appropriate portions of those mapped pages,
and finally send a "close" request to the file server
to ensure that the changes get written to disk.
We will write library routines
to perform these tasks on behalf of the application,
so that the application can use conventional UNIX-style file access operations
such as read, write, and seek.
The client-side code
that implements these UNIX-style file operations
is located in lib/fd.c and lib/file.c.
lib/fd.c contains functions
to allocate and manage generic Unix-like file descriptors,
while lib/file.c specifically implements file descriptors
referring to files managed by the file server.
We have implemented most of the functions in both of these files for you;
the only ones you need to fill in are
fd_alloc and fd_lookup in lib/fd.c,
and open and close in lib/file.c.
The file descriptor layer defines two new virtual address regions within each application environment's address space. The first is the file descriptor table area, starting at address FDTABLE, reserves one 4KB page worth of address space for each of the up to MAXFD (currently 32) file descriptors the application can have open at once. At any given time, a particular file descriptor table page is mapped if and only if the corresponding file descriptor is in use.
The second new virtual address region is the file mapping area, starting at virtual address FILEBASE. Like the file descriptor table, the file mapping area is organized as a table indexed by file descriptor, except the "table entries" in the file mapping area consist of 4MB rather than 4KB of address space. In particular, for each of the MAXFD possible file descriptors, we reserve a fixed 4MB region in the file mapping area in which to map the contents of currently open files. Since our file server only supports files of up to 4MB in size, these client-side functions are not imposing any new restrictions by only reserving 4MB of space to map the contents of each open file.
| Coding | |
Implement fd_alloc and fd_lookup.
fd_alloc finds an unused file descriptor number,
and returns a pointer to the corresponding file descriptor table entry.
Similarly, fd_lookup checks
to make sure a given file descriptor number is currently active,
and if so returns a pointer to the corresponding file descriptor table entry.
| |
| Coding | |
Implement open.
It must find an unused file descriptor
using the fd_alloc() function we have provided,
make an IPC request to the file server to open the file,
and then map all the file's pages
into the appropriate reserved region of the client's address space.
Be sure your code fails gracefully
if the maximum number of files are already open,
or if any of the IPC requests to the file server fail.
Use | |
| Coding | |
Implement close.
It must first notify the file server of any pages it has modified
and then make a request to the file server to close the file.
When the file server is asked to close the file, it will write the new data to disk.
(Be sure you understand why the file system
cannot just rely on the PTE_D bits
in its own mappings of the file's pages
to determine whether or not those pages were modified.)
Finally, the close function should unmap all mapped pages
in the reserved file-mapping region for the previously-open file,
to help catch bugs in which the application might try to access that region
after the file is closed.
Use | |
| Challenge! Add support to the file server and the client-side code for files greater than 4MB in size. |
| Challenge! Make the file access operations lazy, so that the pages of a file are only mapped into the client environment's address space when they are touched. Be sure you can still handle error conditions gracefully, such as the file server running out of memory while the application is trying to read a particular file block. |
| Challenge! Change the file system to keep most file metadata in Unix-style inodes rather than in directory entries, and add support for hard links between files. |
spawn,
which creates a new environment,
loads a program image from the file system into it,
and then starts the child environment running this program.
The parent process then continues running independently of the child.
The spawn function effectively acts like a fork in UNIX
followed by an immediate exec in the child process.
We are implementing spawn rather than a UNIX-style exec
because spawn is easier to implement from user space
in "exokernel fashion", without special help from the kernel.
Think about what you would have to do
in order to implement exec in user space,
and be sure you understand why it is harder.
| Coding | |
The skeleton for the spawn function is in lib/spawn.c.
We will put off the implementation of argument passing until the next exercise.
Fill it in so that it operates roughly as follows:
Use | |
user/icode program from kern/init.c
will attempt to spawn /init from the file system.
You can add new files to the file system by editing the rules in
fs/Makefrag.
Challenge!
Implement Unix-style exec.
|
| Challenge! Implement a shared library loading mechanism of some kind, and move the user-level library code (libos.c, fork.c, etc.) into a shared library. |
spawn with the ability
to pass arguments to the new environment.
For example,
spawn("simple", "-f", "foo", "-c", "junk", NULL); // NOTICE: the trailing NULL!
This call should invoke the program simple
so that it can access its arguments as:
void
umain (int argc, char *argv[])
{
   int i;
   for (i = 0; i < argc; i++) {
     print ("  argv[", i, "] = ");
     sys_cputs (argv[i]);
     sys_cputs ("\n");
   }
}

Output:
  argv[0] = "simple"
  argv[1] = "-f"
  argv[2] = "foo"
  argv[3] = "-c"
  argv[4] = "junk"
There are two components of this work: what the parent does and what
the child does.
spawn must setup the new environment's initial stack page
so that the arguments are available to the child's umain() function.
The parent should format the memory
according to the following diagram.
USTACKTOP:
         +--------------+
         |   block of   | Block of strings.  In the example
         |    memory    | "simple", "-f", "foo", "-c", and
         | holding NULL | "junk" would be stored here.
         |  terminated  |
         | argv strings |
         +--------------+
         |  &argv[n]    |  Next, comes the argv array--an array of
         |     .        |  pointers to the string. Each &argv[*] points
         |     .        |  into the "block of strings" above.
         |     .        |
         |  &argv[1]    |
         |  &argv[0]    |<-.
         +--------------+   |
         |   argv ptr   |__/  In the body of umain, access to argc
%esp ->  |   argc       |     and argv reference these two values.
         +--------------+
If these values are on the stack when umain is called,
then umain will be able to access its arguments via the
int argc and char *argv[] parameters.
Warning: the diagram shows the memory at USTACKTOP since
this is where it will be mapped in the child's address space.
However, be careful! When the parent formats the arguments, it must
do so at a temporary address, since it can't (well,
shouldn't) map over its own stack. Similarly, take care when setting the
pointers arg ptr, &argv[0] .. &argv[n]. These pointers need to
account for the fact that the data will be remapped into the child at
USTACKTOP.
| Coding | |
|
We have set up spawn()
so that it calls a helper function in the same source file,
init_stack(), to set up the new child environment's stack.
Most of the code for init_stack() is done for you;
it allocates a temporary page and maps it into the parent's address space
at a fixed address (from TMPPAGE through TMPPAGETOP-1),
then (after the point at which you need to insert code)
re-maps that page into the child's address space ending at USTACKTOP.
You just need to copy the argument array and argument strings
into the stack page at its temprary mapping in the parent,
as indicated by the comments in the code.
Be sure to change the line that sets *init_esp
in order to give the child environment the correct initial stack pointer.
The child's initial stack pointer should point to its 'argc' argument,
as shown in the figure above.
Use | |
Now for the child side of the spawn: examine the
entry path of the child process under the start label.
You'll see that it is written such that libmain() and
umain() both take arguments (int argc, char
*argv[]).
libmain() simply passes its arguments along to umain().
You'll also notice that the entry path also takes
care of the case when a new process is created by the kernel, in which
case no arguments are passed.
The code on the child side has been done for you; you do not need to make any changes.
Technical Detail: Actually only the argc and the
argv ptr must be placed on the new env's stack. The
argv ptr must point to the &argv[0]
.. &argv[n] array, each of which point to a string. As a
consequence, the &argv[0] .. &argv[n] array and the
"block of strings" can be located anywhere in the new env's address
space--not necessarily on the stack. In practice, we find it
convenient to store all of these values on the stack as has been
presented in this exercise.